tofu summer rolls

tofu summer rolls

Summer is great isn't it? I mean, all that sun, late dinners on the porch, tomatoes. Sure, you're constantly dripping sweat, you can't find anything to wear because all you own are cardigans and black jeans and you keep buying butternut squash even though you know it just doesn't feel right. You are pinning cool ways to decorate your mantle with branches and pine cones and you know exactly how many days there are until Christmas Eve. Oh, by you, I definitely mean me. Don't get me wrong, there are certainly some endearing qualities of the season like al fresco dinners, pool parties and popsicles. I just think summer and I would probably get along a lot better if it wasn't so darn hot all the time and the sun decided to hide itself every once in a while. Just a little break, tiny really. After all, California has had so much sun this year (and so little rain) that the lakes and reservoirs are just about dried up. I'm hoping and praying for a long and wet winter. Wouldn't that just be absolutely glorious? We'll make soup and crusty bread and we'll sit by the fire, sipping tea in our oversized sweaters. Guys, it's gonna be amazing. 

tofu summer rolls

There are still 19 days left of summer, so in the meantime, I promise I'll refrain from complaining about the fact that it's STILL summer and move that we pull it together and really take advantage and live it up. Let's boycott the oven, get outside and eat as many tomatoes as we can fit in our mouths. I'll stop pinning pumpkin recipes and hearty soups and really try to enjoy the moment and I won't even think about how many more days are left before I can legitimately start listening to Christmas music. Let's hit the pool, eat dinner outside until the sun is gone and make popsicles. Alright, that's the pep talk I needed. Thanks guys. Let's do this. 

tofu summer rolls

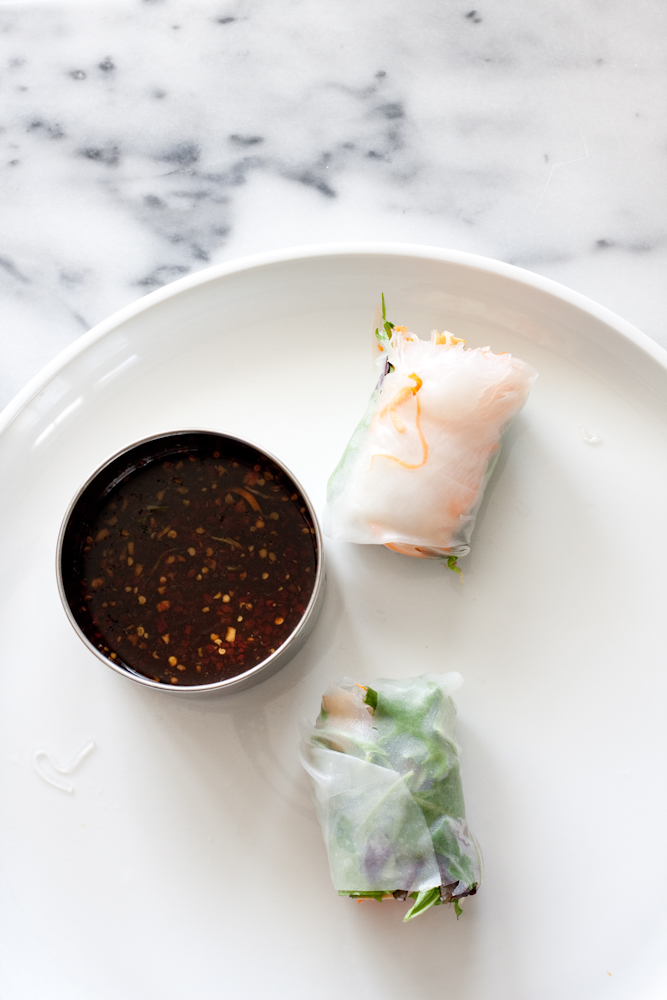
As our first act of living it up, let's make summer rolls. I mean, it's in the name. So perfect, right? Summer rolls are a great dish for using up leftovers from the week. We nearly always have baked tofu around to use as a quick toddler snack or to bulk up salads and scrambles. It works perfectly here and since it was already in the fridge, it was super simple to throw these together. If you don't want to use the baked tofu option for these (which would require some oven action, but totally worth it), you can substitute about 3 cups of shredded rotisserie chicken or quickly grilled shrimp would be pretty great as well. I'd plan for two shrimp per roll if you go that route. 


tofu summer rolls

makes 8 

Ingredients: 

  • 10 rice paper wrappers (it's a good idea to soak a couple extra since it's easy to tear them)
  • 4 green onion, white and light green parts only, split lengthwise, then sliced lengthwise again
  • 3 oz cellophane noodles
  • 1 cup pickled vegetables (alternatively, you can use regular carrot and daikon, julienned) 
  • 16 sprigs cilantro
  • 16 large basil leaves
  • 2 cups mixed greens
  • 24 baked tofu sticks, or 3 cups shredded rotisserie chicken

  • 2 tablespoons soy sauce

  • 2 tablespoons fish sauce

  • 2 tablespoons honey

  • juice of one lime

  • 1 teaspoon garlic chili paste

Preparation:

  1. Cover the cellophane noodles with hot water and let them sit for 10 minutes. Drain them in a colander and rinse with cold water. Set aside. 
  2. Combine the soy sauce, fish sauce, honey, lime juice and garlic chili paste in a small bowl. Set aside.
  3. On a large plate or a baking dish, soak the rice paper wrappers in warm water until soft and pliable, just a few minutes. 
  4. Carefully separate a rice paper wrapper and place it on a plate. In the middle of the wrapper, add three sticks of tofu, a small handful of pickled vegetables, a small handful of cellophane noodles, two sprigs of cilantro, two basil leaves and a small handful of mixed greens. Roll one side of the wrapper toward the middle, tuck the top and bottom over the top and continue rolling until you meet the other side. Slice in half, dip it in the sauce and enjoy. 

smoky quinoa with shrimp + bacon

smoky quinoa bowl

I quit my job two months before our son was due. We had decided I would stay home with him until it made sense for me to go back to work. It was a decision we did not make lightly, especially because living on one income in the San Francisco Bay Area is just straight crazy. We live in the land of million dollar 900 square foot houses and everyone knows somebody who sold their three person start up for a whole lot of money. The weather is pretty much always perfect and within an hour we can be in San Francisco or on the beach in Santa Cruz. If that isn't enough, our dearest friends are here as well as half of our family. For many of our friends who have become parents in the last year, the weather just wasn't enough to keep them here and I can't say I blame them. It's certainly difficult to make ends meet, especially on one income. 

When we were working out our one income budget, we knew we would have to adjust our lifestyle. Birthday dinners would be a pizza night at home instead of a fancy restaurant with six of our friends. Travel would be less frequent, if much at all and we would have to tighten the reigns on all of our monthly budget items, including the grocery bill. That was not an easy task for me. I love grocery shopping. Going to Whole Foods is therapeutic for me (although bringing a toddler along makes it less so). I can spend upwards of two hours walking the aisles, adding things to my cart that look interesting as well as executing a loose list of regular items. We cook a lot at home and we do our best to buy organic whenever possible, which includes the meat we buy and all of that adds up, fast. I started menu planning and making detailed shopping lists and did my best to limit waste. Overall, we have made it all work somehow and I'm so grateful I've had this time with my son. The next kid might not get that luxury. Sorry future kiddo, mommy does love you. 

smoky quinoa bowl from supper at six

At the end of the week, I try to plan for meals that can use up what I have left in the fridge, so we tend to have some kind of stir fry, pasta or quinoa bowl. This week, we had a bag of frozen shrimp stuffed way back in the depths of the freezer and some bacon that needed to be used as well as a bowl of cooked quinoa and some herbs. I thought that all sounded like it would go pretty well together, and man, they really really do. 


smoky quinoa with shrimp + bacon

serves four as a side dish

Ingredients: 

  • 2 cups quinoa, rinsed
  • 8 ounces medium sized shrimp, thawed if frozen, shelled
  • 1 teaspoon smoked paprika
  • 1/2 teaspoon kosher salt
  • 1/2 teaspoon cumin
  • pinch of red pepper flakes
  • 5 pieces of bacon
  • 1/4 cilantro, leaves only
  • 1/4 cup diced red onion

For vinaigrette:

  • 1 tablespoon freshly squeezed orange juice
  • juice of one small lemon
  • 1 tablespoon kosher salt 
  • 1/4 cup olive oil

Preparation: 

  1. Bring two cups of water to a boil in a medium sauce pan. Add quinoa and reduce to a simmer. Cover and cook for 10 minutes. Transfer cooked quinoa to a large bowl. 
  2. In a medium bowl toss shrimp with the smoked paprika, 1/2 teaspoon kosher salt, cumin and a pinch of red pepper flakes. Set aside. 
  3. Cook bacon over medium heat in a large skillet until crisp. Transfer to a plate lined with paper towels. When the bacon is cool enough to handle, chop it into 1/2 inch pieces. 
  4. Wipe out the skillet, leaving a small amount of bacon grease in the pan. Bring the pan the medium high heat. Add the shrimp, and cook until starting to turn opaque, about two minutes. Flip the shrimp over and cook for 30 seconds. Turn the heat off and allow the shrimp to finish cooking in the residual heat of the pan, about one more minute. 
  5. Add shrimp, bacon, red onion, cilantro and 3 tablespoons of the vinaigrette (reserve the rest for another use) to the quinoa. Toss to combine and serve. 

house guests: really good granola

This is the second post in our series: house guests where we are sharing some of our favorite recipes and tips for making your guests feel right at home. You can find the first post here for a hearty banana hazelnut muffin which is the perfect companion to our really good granola. 


really good granola

When you're expecting house guests, it's easy to feel overwhelmed with a long to do list. From cleaning to cooking to itinerary planning, it can feel like a lot. Once your guests arrive, you want to spend as much time as possible with them, not running around trying to play catch up. Earlier in the week we talked about putting together a simple breakfast platter with muffins, granola, yogurt, some fruit topped with sweet condiments like honey or jam. This has worked brilliantly for us. In less than 5 minutes, your guests have a nutritious and protein packed breakfast just in time to plunge the french press. 

breakfast platter

Last weekend, we hosted our dear friends all the way from Norway. They arrived in time for a late dinner on Friday and left before the sun was up on Sunday. We stayed up too late catching up on what has happened in our lives since we last saw each other, and were awoken by a sweet little boy laughing in his crib in what always feels like the wee hours of the morning. We threw together our breakfast platter, poured a french press and rushed out the door to get a head start on the San Francisco Ferry Building Farmers Market. A light breakfast was perfect because all we wanted to do was stuff our faces with every single thing. Our day mostly centered around food, but had we planned something less culinary-centric, I would have packed us some containers of this granola for the trip. It's the perfect to go snack and with an apple can be a quick no-fuss meal. 

really good granola
really good granola

The granola in our house is never the same. Each time I make it, it takes on a new flavor profile, depending on what is in the pantry. However, this recipe is one I will make again and again and then once more. Feel free to swap out different dried fruit or use pecans instead of almonds. Throw in some sunflower seeds or add chocolate chips when you stir in the dried fruit in the end. I think for the holidays an orange and chocolate granola will certainly make an appearance!


really good granola

serves 12

(adapted from this excellent recipe)

Ingredients: 

  • 3 cups rolled oats
  • 1 large egg white, beaten
  • 1 1/2 cups sliced almonds
  • 1 1 /2 cups coconut shavings
  • 1/2 cup maple syrup
  • 1/4 cup walnut oil (or other vegetable oil)
  • 1/4 cup black sesame seeds
  • 1 tablespoon poppy seeds
  • 2 tablespoons packed light brown sugar
  • 2 teaspoons kosher salt
  • 1/2 teaspoon ground cinnamon
  • 1 cup dried apricots, chopped
  • 1/2 cup orange flavored dried cranberries (or regular dried cranberries)

Preparation: 

  1. Pre-heat the oven to 300 degrees and line a rimmed baking sheet with a silicone liner. 
  2. Combine the first eleven ingredients (leaving out the dried fruit, you'll mix this in after baking) in a large bowl until well mixed. Spread it out evenly onto the baking sheet. 
  3. Bake until the granola is fragrant and golden brown, about 40 minutes. Rotate the pan halfway through baking to keep the granola from browning unevenly. 
  4. Place the sheet pan on a cooling rack and let the granola cool completely. Transfer to a large bowl and mix in the dried fruit. Store in an airtight container on the counter for up to one week. For longer storage, keep the airtight container in the freezer for up to two months. 

fruit leather

fruit leather

I hope I'm not alone in this. I have very high standards for what I consider consumable produce. When I'm at the grocery store, I'm the weirdo examining every detail of each piece of fruit I place in my basket. No bruising, no discoloration, and certainly no insect holes (I've been traumatized by not adhering to that last one). On the way home I make a detailed plan to wash, dry and cut everything to make it more accessible and easier to eat, but by the time I strap a toddler to my chest and haul a diaper bag and 80 pounds of groceries up four flights of stairs, I'm lucky if everything makes it into the fridge. Tomorrow. I'll wash and chop and make it all look appetizing, tomorrow. 

Well, tomorrow comes and goes and it's a week later and that sad clamshell of strawberries has been pushed into the depths of the fridge behind the container of hummus and now that we have licked that bowl clean, the strawberries gasp for air, pleading to be acceptable for consumption. Sadly, they just aren't pretty enough anymore. They're dark and starting to shrivel. Normally, they would be tossed under the sink with the rest of the garbage, but I feel bad for them. After all, our relationship had a great start. 

fruit leather puree
blender
strawberryraspberrypuree

As a kid, I remember having a systematic way of eating a fruit roll up. I never unrolled it completely. I only exposed what I was about to eat and kept the rest tightly wrapped. Nibble after nibble, I'd make my way down it's entire foot length, pressing each piece against the top of my mouth until it dissolved. It was probably the most fun snack we ever had in our lunches. Unless, for some unknown reason, we had pop rocks that day. 

You may have already guessed that I might have been a fat kid. It's true. Pop rocks and celery sticks coated in seasoned salt don't exactly scream health food. We had a lot of fun, but I've had to work pretty hard to get keep my 'pop rocks fat' off. In an effort to have a little fun, my son gets to have an occasional treat here and there, but I try to give him what I hope to be a balanced diet. The original fruit roll up has quite a bit of sugar in it, but homemade fruit leather makes a great low sugar snack and gives a trash can pardon to those less than perfect strawberries. 

fruit leather

I'm gonna be straight with you. This stuff takes a long time to make. It's basically an all day affair. Granted, much of that time is a long stint in a pot, a long stint in the oven and a long time cooling and drying so there isn't a ton of manual labor, but it's certainly not quick. If you're able to, I'd say double the batches and make a ton of it so that you'll feel like you'll get more fruit (leather) for your labor. 


fruit leather

makes 2 sheet pans

Ingredients: 

For strawberry+raspberry

  • 2 cups strawberries, stemmed and halved
  • 2 cups raspberries
  • 1 tablespoon sugar

For aprium+blackberry

  • 3 cups pitted and chopped apriums (a plum/apricot hybrid, but feel free to use either of those, or peaches would be excellent, too)
  • 1 cup blackberries
  • 1 tablespoon brown sugar
  • 1/2 teaspoon cinnamon
  • 1/4 teaspoon ground ginger

Preparation

  1. Puree each mixture separately in a blender until very smooth. If you don't want seeds, strain both mixtures through a fine mesh sieve and place each in it's own pot over medium low heat and cook until thick, about one hour. 
  2. Pre-heat the oven to 200 degrees and line two baking sheets with non-stick liners. Spread the mixtures thinly over the liners and smooth the top with an offset spatula, if one is available. 
  3. Dry the mixture in the oven until slightly tacky but not sticking to your finger, about 3 hours. Dry on the liner on a drying rack until completely dry, at least three hours and up to overnight. 
  4. Place a sheet of parchment on top of the fruit leather, covering it entirely and flip it over. Carefully remove the non-stick liner and cut into strips, roll up,  and secure with a small piece of tape. Store in an airtight container for up to one month.